12 Volt Deep CycleLL-16/1240TB AGM Racing BatteryLL-1236TB AGM Racing BatteryLL-1257TB AGM Racing BatterySee all
Battery repair iphone
They are a bunch of most professional people I’ve come across in terms of iPhone service. My fone was picked up within an hour of call and delivered 4 hours later and on time. Their assurance and depth understanding makes you comfortable enough to do business with them. Their charges were reasonable but I’m satisfied with overall service so 5 stars for that. They would be my only go-to guys now for any apple related service.
[doublepost=1515001590][/doublepost]Does anyone know how long it actually takes for the Genius to perform the battery replacement?Generally about 60-90 minutes. Sometimes it can take longer depending on the other workload. Usually they'll tell you to go shop around for a bit. If it's located in a mall it's not much of an issue.
.
Watch batteries repair
Remove the screws holding the battery together. There's a hidden screw under a piece of plastic. You need to pry the plastic off to get at the screw underneath. I used a very thin screwdriver to pry it off.
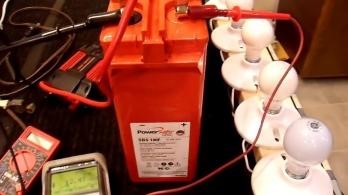
DOUBLE CHECK THAT YOU ARE TOUCHING POSITIVE TO POSITIVE AND NEGATIVE TO NEGATIVE.
Iphone 6s repair battery
To prevent future corrosion on the battery cables, you can apply dielectric grease or petroleum jelly under the clamps. You should also keep up a regular maintenance routine to avoid having to change your battery more often than necessary. GUNK - Battery Terminal Cleaner & Protector 7.09 $ Dielectric Grease Starting at 3.19 $ Electric Vehicle Batteries
Try the correct position of the battery pack in the plastic shell.
Battery watch repair
After cleaning battery acid from the battery, you have to recondition it. For that purpose, fill the cell with electrolytes again. The electrolyte is usually made of distilled water and Epsom salt. This allows the battery to charge quickly by avoiding sulfates. Then, pour it in the battery.
Ebike battery repair
Ebike battery repairs
Battery repairing near me
Electric bike battery repairs
Iphone repair battery
Battery repairs
Hybrid battery repair
Battery watch repair
Repair of battery
Battery repair iphone 6s
Battery iphone repair
Battery repair for iphone
Repair batteries
Getting an appropriate battery for your car is crucial to the replacement process. Your owner’s manual should provide the information you need to pick a battery that’s compatible with your vehicle in terms of size, voltage, and terminal placements. If you were happy with your old battery, look for its name and manufacturing number on the battery case so you can find the same one. The type should be indicated on the side of the battery or on the label.
Iphone repair battery
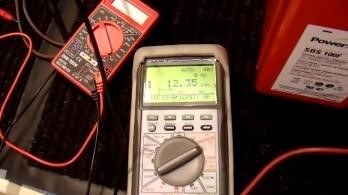
A car battery should be replaced when its capacity has dropped below 12 volts -- which happens to most batteries after three to seven years of use. Here are some signs that your battery is running critically low:
There are many signs that your phone’s battery might need iPhone 7 battery replacement. For one, your iPhone might shut down unexpectedly. In this case, you might try to soft reset by holding the sleep/wake buttons and the home button. If this does not work, your battery might need to be replaced.
You can leave the remaining protective film on the edge of the housing until you have connected the display and attached the cover plates. This prevents anything from sticking to the adhesive frame beforehand. Connecting the display
Battery repairing near me
Now pull out the adhesive strips as slowly and flatly as possible from under the battery so that they do not tear.
For more information about recharging a dead battery, visit your local NAPA Auto Parts store to speak with an expert. Latest posts How to Take Your Car Out of Winter Storage 10 Must-Have Car Service Tools Share: How to Fix a Flat Tire How To Replace Brake Pads How to Replace Your Engine Air Filter 8 Replies to “How to safely and quickly recharge a dead car battery”
[ Featured On/Off ] [ Full Articles On/Off ] [ Fluid | Fluid HD ] [ Auto | Light | Dark ] Best Cell Phone Repair in Brampton Expert recommended Top 3 Cell Phone Repair in Brampton, Ontario. All of our cell phone repair shops actually face a rigorous 50-Point Inspection, which includes everything from checking reviews, ratings, reputation, history, complaints, satisfaction, trust and cost to the general excellence. You deserve only the best!
Repairing batteries
It can feel like the end of world when a device needs repair, but at iRepairToronto, we want to make the process quick and painless.
For more information about recharging a dead battery, visit your local NAPA Auto Parts store to speak with an expert. Latest posts How to Take Your Car Out of Winter Storage 10 Must-Have Car Service Tools Share: How to Fix a Flat Tire How To Replace Brake Pads How to Replace Your Engine Air Filter 8 Replies to “How to safely and quickly recharge a dead car battery”
Booked my repair online. My screen was fixed at a convenient time for me at home. The repair took less than half an hour. My phone was also sanitised, Fabulous service, price and great communication.
Repair of battery
(If repair for the electric vehicle is not possible, the battery or module is sent to a partner for remanufacturing or recycling.)
This post is NOT sponsored by Ryobi. They do not approve of or endorse this method for fixing a Ryobi battery. AT all.
Description: it is used to protect your hands from acid as you work with Lead acid batteries
Be Part Of Our Story!
Repairing battery
Most phone repairers offer pretty limited warranty periods on their repairs, which means if things go wrong down the line with your phone, you’re left high and dry. In fact, most repair stores (including Apple themselves) will only offer you a three month warranty on your repairs.
Battery repair iphone
Yes, it is really a serious problem. I can understand when we face this problem, we are really very desperate. Thankfully, I got fast, simple, and genuine solution from this video: https://youtu.be/xrIMJgN7kPI (https://youtu.be/xrIMJgN7kPI)
Battery repair iphone
Put the plastic cover back on the battery pack (just the part that goes into the charger) and set your battery on the charger to see if it will take a charge. If you still only get a red flashing light and the battery won't charge, boost the battery some more. I find the battery charger will recognize that the battery is good again when you boost it to between 10 and 14 volts.
Contact Us
By now you see that being proactive about your iPhone’s problematic battery status is well worth the cost of a battery replacement, so what are you waiting for? Book a phone repair online with one of our experts to select your desired time and place for us to meet you. We’ll be there in a heartbeat, within the same day, so your battery is running like new in no time - click here to get $10 off your first service with us.
Repair watch battery
Developing tools and content with passion to help progress this niche for DIYers, come check out our Facebook group where I am an admin, show off what your building and get answers from more people like me.
Corrosion around the battery terminals: Your local Midas technician will visually inspect these during every Midas Touch Courtesy Check1 and can clean away corrosion safely.Something’s draining your battery: Check every light switch, door (liftgate included), and lighted compartment in your vehicle. You may be leaving a door slightly ajar, or a faulty latch could appear closed but is allowing your lights to stay on overnight.End of battery life: Every car battery has a finite charging capacity, testable with a voltmeter machine.A bad alternator: The alternator is responsible for recharging your battery as you drive, so it’s one of the first mechanical problems to check.Other defective vehicle parts: From the fuses to the serpentine belt.
Swelling is actually a safety mechanism as it prevents the battery from exploding. It's important to keep in mind, however, that if a lithium polymer cell is designed and used in the proper way, it won't reach the conditions required for it to begin swelling.
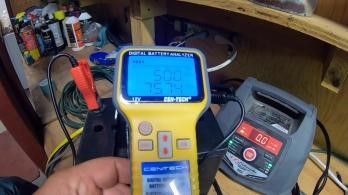
What is the relationship between voltage and capacity of 18650 li-ion battery? September 26, 2019
With the new battery, the health becomes 100%. So, if we replace the battery of your iPhone, you will get 100% health.
Description: it is used to protect your hands from acid as you work with Lead acid batteries
!
Repairing batteries
Iphone battery repair
Key fob repair
Repairing ebike battery
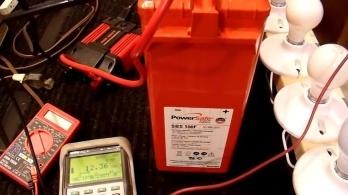
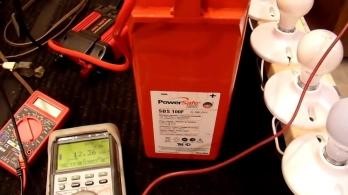
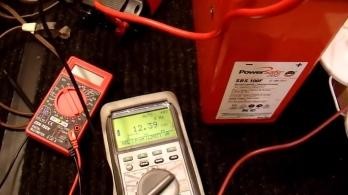
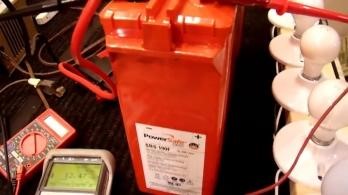
The User Guide provides estimated charging times based on battery size (Ah) and a 50% depth of discharge (DOD): 20 Ah in 3 hours 40 Ah in 6 hours 80 Ah in 12 hours 100 Ah in 15 hours 120 Ah in 18 hours
Most difficult step is cutting the plastic shell of the battery pack.
Sulfation is a chemical reaction that causes sulfate crystals to build up on the plates of the battery. The more crystals that are present, the longer charging times the battery requires, and the less efficient it becomes. By reconditioning the battery, you refurbish it and remove those sulfates. You also replenish the electrolyte solution inside the battery, which allows it to recharge faster and function like it is new.
Cell2Fix is one of the city's best cell phone repair shops in the city. Their Professional Team of Technicians with over 20 Years of Experience. They are providing the lowest price guarantee; customers can enjoy the convenience of getting gadgets repaired at their place. They complete all eligible repairs in 30 minutes. They are also providing diagnostics and quotes to their valid customers. They ensure the reliable and durable replacement of broken parts. They also offer all kinds of software installation and troubleshooting services. They are beating the best quotes by 10%. Unlocking Services, Water/liquid Damaged Mobile, Cracked or Broken Screen Problem, Digitizer and Lcd, Battery, Power Issue, Camera Replacement, Power/volume Button, I Phone, Samsung, Blackberry, Nokia, Lg, Software Installation, Compute, Laptop Service and Repair & Tablet Cases Book Appointment inf***@c***.com cell2fix.com (905) 453-8308 Reviews Write a Review
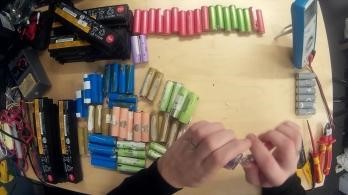
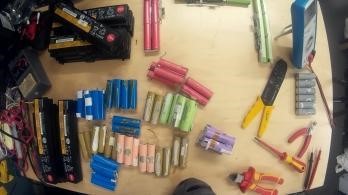
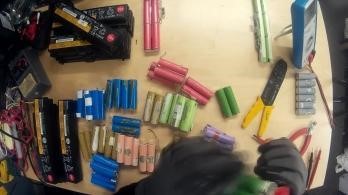
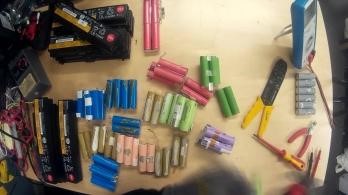
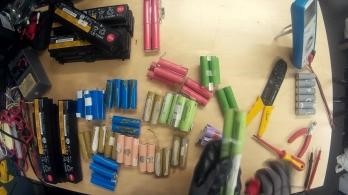
Hi, my P755-S5285 Toshiba Satellite Li-Ion laptop battery pack PA3817U-1BRS seems to have died..10.8V 4200mAh. Inside it has 6 x SANYO K UR18650A R2112 cells... 1. Can these be safely replaced? 2. What are the best replacement Li-Ion batteries to use to replace the SANYOs? 3. Is it 3.6V or 3.7V...? 4. What mAh capacity would be best to use? 5. Can I increase the 4200mAh to what amount and how? 6. What do the ''K'' and ''R2112"' and 'P23B'' etched on the cells' plastic covers mean? 7. How can one identify and differentiate clearly between the various types of these Li-Ion batteries? Thanks to all your comments and advice.
Description: it is required to pour water through holes of battery during reconditioning.
Hybrid batteries repair
Repair e bike battery
Repairing iphone battery
Battery watch repair
I have a sony laptop VGN-NW350G. My battery die, so I had to buy a new battery. Then my sis laptop batter die and we share the same batter. Our laptop are different but we have 1h and 30min that this laptop can charge up to. Since we started sharing the same batter, our laptop battery cut the 30min. Now it can only save up to 55min. Can you help me. =.= Oh yeah I find out my sis battery still work.
Battery iphone repair
Install the battery caps that you took off again, or insert plastic plugs into the drill holes you needed to make. Gently shake the battery to ensure all of the solution is equally distributed.
Please help I have Lenovo z510 battery which is not taking charging any more so i e decide to open it. After opening i found that its cells are working and when i check the voltage with the help of multimeter its shows 14 volt however when i check the voltage across the terminals of the battery it shows nothing. So kindly tell me whats the problem wirh it ? It has 4 cell internal battery of 15 v n 32000 mah.
The link holder is good and give you a good grip to remove the links of the watch. Great little watch tool kit for the average person. Makes removing links a breeze. I have over a dozen watches and this kit has everything I need to help with necessary repairs. Please provide a postal code or a city, or select a city from the directory. Canada Business Directory Ontario Brampton Battery Repair & Rebuilding in Brampton Batteries - Dry Cell Batteries - Storage - Retail Batteries - Storage - Wholesalers &/or Manufacturers Tires - Retail Tires - Used × A-AN AO-AZ B-BI BJ-BZ C-CG CH-CN CO CP-CZ D E-EH EH-EO EP-EZ F-FL FM-FZ G H I J K L M-MD ME-MZ N O P-PH PI-PP PQ-PZ Q R-REN REO-RZ S-SD SE SF-ST SU-SZ T-TH TI-TZ U V W X-Z × Bramalea Castlemore Cooksville Georgetown Halton Hills Hornby Kleinburg Malton Streetsville ` × L6P L6R L6S L6T L6V L6W L6X L6Y L6Z L7A × Calgary Edmonton Scarborough Mississauga Surrey London Ottawa Quebec City Toronto Vancouver Victoria Winnipeg Montreal Halifax Regina Saskatoon Lawyers Florists Dentists Pet Grooming Tanning Salons Fitness Centers Dentists Lawyers Restaurants Roofers Car Repairs Electricians Movers Electricians Dentists Painters Plumbers Roofers Restaurants Beauty Salons Plumbers Chiropractors Hotels Florists
thanks for answer,battery chatging time is ok.onliy problem is wrong voltage displaying!
In Alberta, we’re no strangers to harsh weather conditions. Temperatures can swing from 35°C in the summer to -35°C in the winter—hard not only on you, but also on your car and its battery.
Battery repair iphone 6s
Hybrid battery repairs
Repair iphone battery
Iphone 6s battery repair
Remove the two pentalobe screws located to the right and left of the Lightning connector and put them in a screw storage box.
Yes, it is really a serious problem. I can understand when we face this problem, we are really very desperate. Thankfully, I got fast, simple, and genuine solution from this video: https://youtu.be/xrIMJgN7kPI (https://youtu.be/xrIMJgN7kPI)
Desulfation is quite a tedious and time-consuming process, but worth every second given its effectiveness. Desulfation is not as complex as it is made out to be. Firstly, you should remove the Lead sulfate build up. Next, clean the deposits with the help of Magnesium Sulfate or Epsom Salt. With Epsom Salt, distilled water and a regular Lead acid battery charger, you are ready! But for safety purposes, please ensure to put on protective gloves and eyewear. Take some clean and dry Epsom Salt into a dry cup. For an averaged sized battery, measure about 10 tablespoons of Epsom Salt. The distilled water should be heated up to temperature around boiling point. Add distilled water to Epsom salt to forma thick liquid and stir it properly to dissolve Epsom Salt well. Pour the mixture of distilled water and Epsom salt into every battery cell battery as much as possible. Plug in your charger after having the battery covered and set the charger for High Amps (high current). It is advisable not to use smart charger for more readable meter. Meter only shows two possibilities-“zero” or “charged”. Depending on the extent of sulfation, the entire process might take some time. Next, switch it over to low current and keep it charging until it is full. Once the battery is fully charged, discharge it and charge it again. The current should be low this time. Charging on low current enables the Epsom Salt to break sown the lead sulfate deposits on the battery. When you charge it on the second try, it is finally ready to soar! You can repeat the desulfation process for maximum five times on any battery which can extend its lifespan by years.
I have a lenovo battery plugged in but not charging and out of warranty. What can I do
Comments are intended for "commenting," an open discussion amongst site visitors. Battery University monitors the comments and understands the importance of expressing perspectives and opinions in a shared forum. However, all communication must be done with the use of appropriate language and the avoidance of spam and discrimination.
it is my first time by here, but I am sure a good place where people can hide a long time. thank you for the pleasure.
Repair e bike battery
Repair watch battery
Iphone repair battery
Repair e bike battery
Remove the two pentalobe screws located to the right and left of the Lightning connector and put them in a screw storage box.
Brakes & Brake RepairBrake FluidBrake Rotor ReplacementBrake InspectionABS BrakesSoft & Spongy Brakes Oil ChangeSynthetic Oil ChangeHigh Mileage Oil ChangeSynthetic vs. Conventional OilOil Leak
If you’re visited The Regina Battery Depot website in the past you know it was, well, a little dated. Yes,
>>>TO:Sutajit Paul hi Sutajit Im interested in your project. I think I can help you but i need some data about your battery. please contact me by this email address: smbTabatabaei@gmail.com
SwitchArcade Round-Up: ‘Cannon Dancer’, ‘Castle of Shikigami 2’, Plus Today’s Other New Releases and Sales
Depending on the method of iPhone battery replacement you prefer and what model you have, replacing an iPhone battery can cost you from $0 to $50.
Watch battery repair
Watch batteries repair
Ebike battery repairs
Iphone 6s battery repair
How to Get Your iPhone's Battery Replaced at Apple Store or Apple Authorized Service Provider