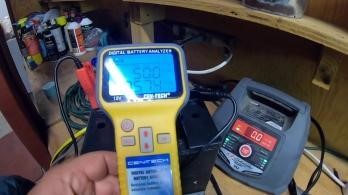
You can’t recondition just any battery. First, you need to test it to make sure it will respond properly to the reconditioning process.
Batery repair
Fiberplane open-source libraries assist developers using metrics in the observability stack
Wiha PicoFinish Phillips Screwdriver PH00 Removing the speaker Removing the Taptic Engine The right tools for your repair
.
Iphone battery repair
Because batteries can corrode and leak and harm the very thing they are intended to power, remove batteries from items that are not used frequently. How Can I Identify a Battery Problem? If a device powered by a household battery won’t work, make sure the batteries are properly inserted, positive to positive and negative to negative. Clean the battery. If a battery looks off-color or shows any sign of flaking or corroding, replace it with a new battery. If a battery looks okay, gently polish both ends of the battery and all of the contacts inside the battery holder with a silver polishing cloth, pencil eraser, emery board, or fine sandpaper; don’t touch the cleaned areas. If the device still won’t work or works sluggishly, test the batteries with a multimeter (below), or with the self-tester on the battery. Replace any batteries that test low. If the device still won’t work, the problem is more serious than batteries.
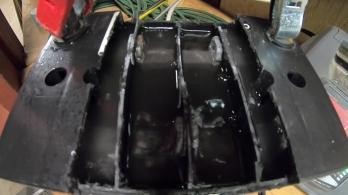
Adding distilled water may help submerge the plates and enable more reaction to help give the engine a few more turns. This will help if the problem is due to low electrolyte levels. Using distilled water only as an electrolyte booster is an alternative if you don’t have an Epsom salt or aspirin available.
Repair hybrid battery
You might be asking how often should I get my battery checked? We recommend a regular annual inspection to catch the problem before it occurs. Also, remember that the average life expectancy of a battery is 3 to 5 years.
Battery Joe carries numerous marine batteries: Starting, Deep Cycle, and Dual Purpose Batteries. We also carry AGM Marine Batteries.
Battery repair
All Rogers stores can help mail out your phone for repair. These repairs typically take 1-2 weeks.
Electric bike battery repairs
Key fob repair
Battery repairer
Battery repairer
Iphone battery repair
Battery repairs
Batery repair
Repairing batteries
Batteries repair near me
Repair e bike battery
Repair of battery
Battery repair near me
Hybrid battery repair
Your go-to destination for lawn tractor batteries providing plenty of cranking amps. We'll find the right batteries for your equipment.
Hybrid batteries repair
If you’re visited The Regina Battery Depot website in the past you know it was, well, a little dated. Yes,
Unlike ‘waste’ batteries, batteries that are destined for repair can be freely transported across national borders. This is because they are given the status of ‘product’, not ‘waste’, according to EU norms.
Once the iPhone X has been opened, no warranty can be given for waterproofness. Also the warranty for protection against dust and splashing water of the IP67 classification expires. Place the suction cup on the bottom edge of your device and pull it upwards to create a narrow gap between the stainless steel and display frame. Insert a sturdy, flat tool into the narrow gap to enlarge it. At the same time, press the display slightly upwards with the tool, using flat plastic picks. Be careful not to go further than 5 mm into the gap with your tool to avoid damaging any components inside the Iphone X. Move the tool one step at a time around the frame of your iPhone to remove the stuck display completely. Use the plectrum to keep pushing upwards so that the noses come off the stainless steel frame. Opening the display
Repair a battery
Our mission is too make buying, accessorizing or fixing a phone easy for you. Leave all the hard work to us! Address: #440 500 Timberlands Drive, Red Deer, Alberta T4P 0Z4 Phone: (403) 314-4400 Email: iTech Wireless repairs mobile phones and tablet devices. iTech WirelessServicesBrands We ServiceAppleiPhoneBattery Repair iTech Wireless® provides a Lifetime Warranty for all iPhone Battery repairs. Find a repair store location near you. Call us with any questions for all your Mobile Phone repair needs. We are here to help! Repairing mobile devices and tablets for more than 18 years now, we provide repairs for major brands and most makes of mobile phone and tablet devices. Our expert technicians can repair most problems in 20 minutes while you wait. Visit one of our 2 locations and have your device repaired in store Store Locations Mail in your device for repair Call for info We can pickup your device, repair it and deliver it back to you iTech Wireless has the best warranty in the GTA. We offer a price match guarantee as well. Your satisfaction is 100% guaranteed at The Repair Store. Brands We Repair ZTE Alcatel Google HTC BLU Huawei Samsung Sony LG Apple Asus Blackberry Motorola OnePlus Services Phone Repair Laptop Repair Tablet Repair Brands We Repair Support Locations About Us Browser width - Matching device - HomeShopiPhone Repair, iPhone Battery RepairiPhone 6s Battery Replacement iPhone 6s plus Screen Replacement $200.00 $119.99 iPhone 6s Camera Replacement $80.00
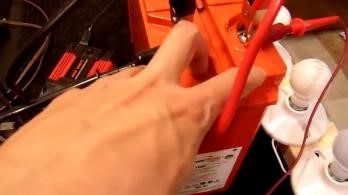
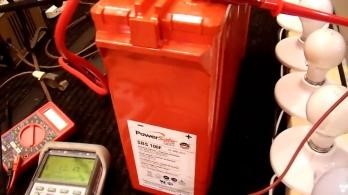
Just keep repeating the "pulse" boosting and testing the battery until it will finally be recognized by the charger and you get the green light.
THanks James. It works! Although the fact that we all have to go through this is ridiculous. ~ karen!
Hybrid batteries repair
NiCd, NiMh & Lithium Battery Repairs Service from County Battery Services, the UK's number one electric bike battery repair company. County Battery Services can repair and rebuild e-bike batteries, Stewart Golf F1 Golf Trolley battery packs, drill batteries, power tool battery packs, Luggie batteries, mobility scooter battery packs, snap-on drill batteries, GoCycle G1 battery packs, lithium battery packs and many more.
Great dialogue about appointment time and I was kept up to date at all times. I was made aware of cost before work was done. Work was do well and in a timely fashion.
Description: you can start a car with the help of other car if your battery dies.
Iphone 6s battery repair
Great, NOW YOU TELL ME!! Kidding…. My fault. Just threw away three batteries that didn’t survive the winter on the charger. Bought a pair of the newer, larger capacity batteries, but I’m dying to try your method when my one remaining old battery dies. Thanks for the tip though!!
If you’re visited The Regina Battery Depot website in the past you know it was, well, a little dated. Yes,
Front Page Roundups GuidesHow TosReviewsBuyer's GuideUpcoming ProductsForumsArchivesTips / Contact Us
Be Part Of Our Story!
Battery repairing
The much larger point is, if you had even a basic comprehension on how rechargable battery backs work you would never find yourself in this situation. Its really not complicated. just remember like 3 basic things
Repair batteries
Before hooking up a car battery to a charger, review these important safety tips. It’s advisable to wear gloves and eye protection. Remove any jewelry or loose clothing. Be sure that the charger is as far away from the car as the cables will allow. Check the manual to see if your car has a remote positive terminal located in another part of the vehicle; use this terminal for safer charging. Always use the red positive jumper cable first. Don’t face the battery when connecting the clamps. Do not touch the clamps while the charger is on. Never connect the negative clamp to the carburetor, fuel lines or body panels of the car. Charging Settings
Repair watch battery
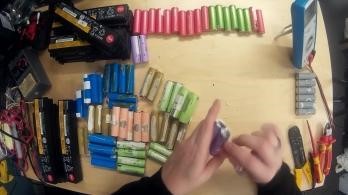
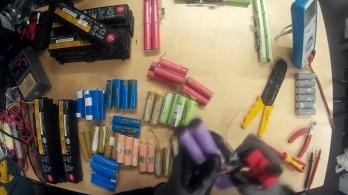
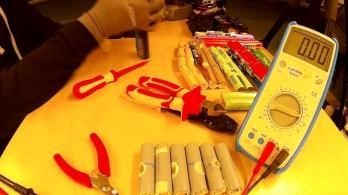
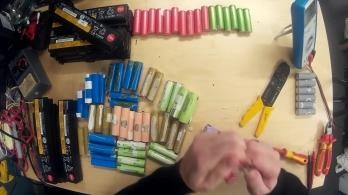
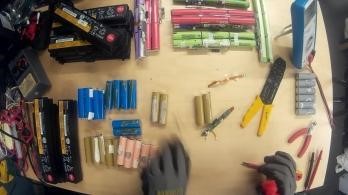
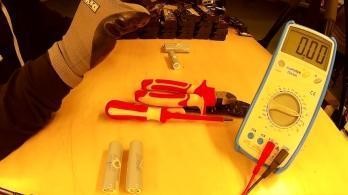
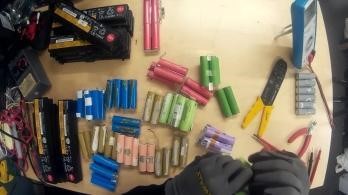
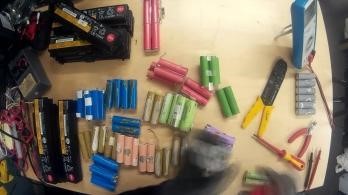
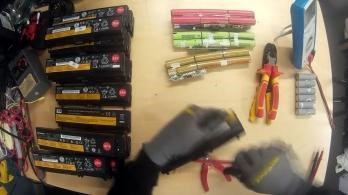
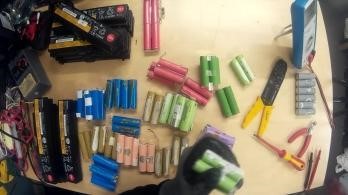
Step 3: After that, use a multimeter to check each cell group’s voltage to find the bad cells. If you find a cell lower than 2.5V it is more than likely bad and if you find a cell higher than 4.2 volts, it could be dangerous.
Contact Us
Fast good service, pleasure to deal with. Broken screen was fixed quickly on the same day.
Battery repair near me
I have a lenovo battery plugged in but not charging and out of warranty. What can I do
There’s no need to let your trusty old cordless tool go when it no longer holds a charge, and a replacement battery is too costly or hard to find. Let a trained professional at an Interstate All Battery Center rebuild your NiCd or NiMH battery pack to keep your tools powered up. Meet or exceed OEM specifications Are backed by a one-year warranty Are expertly assembled on-site Sometimes standard batteries just won’t work in a device. Custom batteries are the solution for unique battery requirements and uncommon terminal configurations. Come into your neighborhood Interstate All Battery Center and let them build the battery to power whatever it is you need to make go! Find a Battery Find a Location All Battery Center Dealers Distributors How-To's Careers Culture History Recycling Sponsorships YouTube Twitter Facebook Instagram LinkedIn GreenLight Blog FAQs Contact Us Warranty Safety Data Sheets News Center Class Action Settlement Privacy Policy Terms & Conditions Warranty ADA Compliance Find Your Battery {{filter.Label}} {{filter.Label}} Zip Code {{$parent.selectedProduct.AppGuideActionText}} {{$parent.selectedProduct.AppGuideActionText}} {{a.DisplayText}} Battery Size Battery Size Battery Voltage Battery Voltage
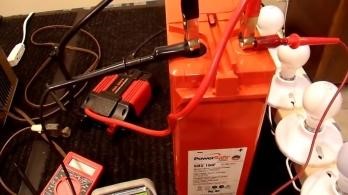
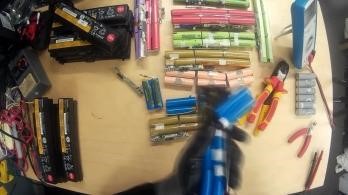
Plug your AC adapter in and using the wires, boost your dead battery. Just touch the black wire to the negative terminal (the one with the black wire going to it) and the white wire (or striped wire) to the positive terminal (the one with the red wire going to it). Do this on and off for approximately a minute. DOUBLE CHECK THAT YOU ARE TOUCHING POSITIVE TO POSITIVE AND NEGATIVE TO NEGATIVE.
Mobile Klinik Professional Smartphone Repair is one of the city's leading cell phone repair shops. They have highly skilled, trained technicians to handle all kinds of cell phone repair services in Brampton, Canada. They provide a lifetime warranty on all parts and repairs, a top choice for Canadians needing device servicing from the experts. Customers can send your device using their fast courier partners, and we'll send it back fixed the day they receive it. They are also providing buy and sell the option to the customers. They provide immediate quotes and diagnoses to all their cell phone damage or breakdown services. They also provide online chat on their website for the customer's use. Samsung, Google Pixel, I Phone, I Pad, Lg, Huawei, Blackberry, Motorola, I Os, Android, Tablet Repairs Buy & Sell Phones Diagnostic and Performance Optimization, Data Protection and Backup, Water Damaged Mobile, Virus Removal & Mobile Unlocking bra***@m***k.ca mobileklinik.ca/stores/br... (289) 948-2770 Reviews Write a Review
Great idea , but do you have to pull the battery apart ? Can you not just boost it from the two charging tabs on the stem of the battery ?
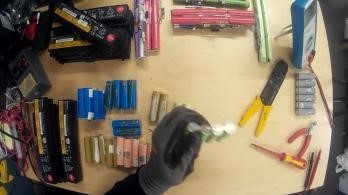
Step 2. Separate and strip off 1" of each wire. You have *just* made booster cables! Good for you.
!
Battery repair iphone 6s
Ebike battery repair
Battery repairs
Repair of battery
The best time to think about your car battery is before it goes dead and leaves you stranded. So, we’re here to test your battery regularly and replace it when its voltage is low… but not too low.
We put together a guide on how to get more life out of batteries, and easy-to-use tips to keep your battery healthy.
The services are just amazing! Got my iPhone XS Max repaired. Now my phone is as good as new though it’s an year old phone. Highly recommended. Kudos team Rapid Repair!
KW208 12V Battery Tester, 100-2000 CCA Load Tester Automotive Tools Alternator Tester Digital Auto Battery desulfator Charging Cranking System Tester for Car Truck Marine Motorcycle SUV Boat Sponsored Hide feedback 25 Amp Lithium Battery Charger, 12V and 24V Lifepo4,Lead-Acid(AGM/Gel/SLA.) Battery... $109.97 NOCO Boost Plus GB40 1000 Amp 12-Volt UltraSafe Lithium Jump Starter Box, Car Batte... $154.98 20 Amp Lithium Battery Charger, 12V and 24V Lifepo4,Lead-Acid(AGM/Gel/SLA.) Battery... $89.97 Car Battery Charger, 12V/8A 24V/4A Compatible Automotive Smart Portable Battery Cha... Limited time deal $31.00 List: $39.99 (22% off) Battery Tender 12V, 800mA Weather Resistant Battery Charger and Maintainer - Water ... $69.95 Energizer 4-Amp Battery Charger/Maintainer, 9-Step Smart Battery Car Charger with L... $39.94 Unocho 24V Battery Charger Automatic Smart Charger 5A trickle Charger and I/O Switc... $57.69 Unocho 12 Volt Battery Charger 750mA Smart Automatic Battery Charger and maintainer... $31.69 Car Battery Charger 6V and 12V 2-Bank, 4-Amp (2-Amp Per Bank) Fully-Automatic Smart... $130.99 Unocho Automatic Smart Charger for 6V 12V Lead-Acid Batteries 14.4V LiFePO4 Lithium... Intelligent charger, suitable for charging various diesel vehicles such as automobiles, motorcycles, trucks, etc. 3. Intelligent digital display. The display shows charging voltage, charging current, battery charge and temperature. 4. Repair battery problems by repairing empty and sulphated batteries for longer life batteries. 5. Switch to one button in multiple mode: Car / motorcycle / start / stop / main battery, secondary battery in double mode, does not damage the battery. 6. Click the button to switch accurately. When you touch them, you will hear a click. The button is sensitive and smooth. Intelligent charging: Skirt with precision New design – touch the button, the oil ticks when touching, reject the button, is insensitive Multiple protection: The battery charger has multiple protection functions such as undervoltage protection, reverse polarity protection, short circuit protection, etc. At the same time, the smart charger has a fan that prevents overheating during charging and extends the life of the car charger. Easy to use Multiple protection, easy and safe operation. Step 1: Red clip terminal battery positive electrode, black clip clame battery negative pole. Suitable for a variety of lead-acid batteries This helps diagnose and repair battery problems and extends the battery life of cars, trucks, motorcycles, lead-acid batteries, lawnmowers or boats High-quality materials All-inclusive crocodile clips and EU copper wires ensure stable current output, wide voltage universal. Looking for specific info? See questions and answers Product information Brand Haisito Manufacturer HTRC Model ZYX-J30 Batteries included No Batteries Required No Battery Cell Composition Lead Acid Manufacturer HTRC Item model number ZYX-J30 Product Dimensions 5.8 x 9.8 x 17 cm; 560 Grams ASIN B083FG2742 Date First Available Jan. 19 2020 Customer Reviews 4.4 out of 5 stars Best Sellers Rank #983 in Automotive (See Top 100 in Automotive) Would you like to tell us about a lower price?
my laptops battery got wet and it's not charging anymore what am I suppose to do.
Keep your cell groups in balance. Keeping a battery's cell groups in balance ensures that your battery not only works optimally but lasts as long as possible. If your cells come out of balance, the lower cells spend more time producing more heat which further degrades their health.
Batteries repair
Battery repairer
Repair watch battery
Repairing battery
With proper care, your car battery can last three to five years. Certain signs will indicate your battery is failing. Luckily, a car battery replacement is one of the easiest DIY jobs—as long as you follow the right steps. Use this guide to learn how to replace your car battery on your own. Difficulty: Easy Duration: 10-30 minutes How often: every 3 to 5 years
Battery repairing
You don’t need much space to complete a battery replacement, but you do need proper lighting. Do this job outside in the daytime or in a well-lit area indoors. Disconnect the negative terminal with a small wrench (8mm or 10 mm). Disconnect the positive terminal. Remove the battery holder/clamp and any bolts or screws keeping it in place. Remove the battery from the battery tray (it may be heavier than you expect).
Used Cars for SaleNew Cars for SaleSell My CarCar ValuatorAbout CarSwitchHow It Works
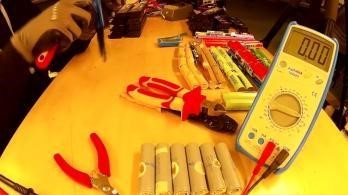
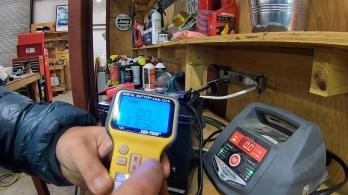
If you want to know how to identify and fix a broken battery, here are some general guidelines. Give the battery a visual inspection to make sure there are no burn marks or signs of leaking fluid. Use a multimeter to check the voltage of the battery to make sure it's within the expected range of the battery. Check the voltage of the battery immediately after you charge it to see if it's rapidly falling on its own. Also, feel the battery during normal operation to make sure there are no hotspots.
JavaScript seems to be disabled in your browser. For the best experience on our site, be sure to turn on Javascript in your browser. NewsAbout BenzoCompany ProfileBENZO Energy CultureCompany PictureProduction AbilityGuaranteeLithium Ion Battery18650 Batteries 2000mAh18650 Batteries 2200mAh18650 Batteries 2500mAh18650 Batteries 2600mAh18650 Batteries 3000mAh+Li-ion Polymer BatteryDigital BatteryMedical BatteryHigh C-rating BatteryElectric Bike BatterySmall Rechargeable LiPo BatterySuper-thin BatteryWearable Device BatteryLiFePO4 BatteryBattery CertificatesContact Home News How to repair lithium batteries ?What is the Lithium battery repair method ?
Be advised that Apple said initial supplies of replacement batteries for some iPhone models may be limited, and we've heard that some of its stores and repair shops are currently out of stock. Apple doesn't appear to be notifying customers about the inventory shortages until they arrive for their appointment.
Battery repairs near me
Repair ebike battery
Repair a battery
Hybrid battery repairs
Wiha PicoFinish Phillips Screwdriver PH00 Removing the speaker Removing the Taptic Engine The right tools for your repair
We offer a full range of miniature batteries for hearing aids, medical devices, and watches. Our selection also includes batteries for calculators, electronic books, other small electronics.
Are you an e-bike rider? Then contact your dealer for the desired product. To be able to use the full range of Shopware 6, we recommend activating Javascript in your browser. English Deutsch English Français Italian Nederlands Schweiz, Deutsch Schweiz, Französisch Schweiz, Italienisch Continue Shopping Close menu Log in 0 Products Service Technology About us Find a FIT dealer E-Drive Drive Brakes Lights Electronic accessories Gears Attachments Workshop equipment Services Wheel set Workshop / shop Sales E-bike manufacturer Become a FIT specialist dealer Partnerships Support FIT E-Bike Control App Key card Navigation with Komoot System System comparison Advantages of FIT motors Advantages of FIT batteries Advantages of FIT displays Accessories E-Bike Tracker Tire pressure sensors Electronic frame lock Jobs and career Blog Taking an e-bike with you in a camper van Using cycle paths on an e-bike E-bike Buyer’s Guide Part 2 E-bike Buyer’s Guide Part 1 E-bikes and IoT Press Contact Responsibility Close menu Blog Repairing an e-bike battery REPAIRING AN E-BIKE BATTERY – YES OR NO?
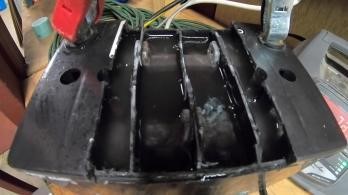
Unless some of the battery acid was spilt, you usually do not need to. Topping off the battery acid compartment with distilled water will often do the trick. However, keep in mind that it’s important to be extremely careful when you are doing this due to the highly toxic nature of battery acid. In most cases, you will be able to use this method several times to extend the lifespan of your AGM battery.
Sure, we can work something out. Just give us a call on 8130609004 and we will see what is the best that we can do for you.
Wow, superb blog structure! How lengthy have you been blogging for? you made running a blog look easy. The full glance of your web site is great, as well as the content!! I really enjoy and read it carefully I get a lot of information I hope you will share some more info about Car Battery Chargers
Battery repair
Watch battery repair
Battery repairing near me
Iphone 6s battery repair
Monday9:00 AM - 6:00 PMTuesday9:00 AM - 6:00 PMWednesday9:00 AM - 6:00 PMThursday9:00 AM - 6:00 PMFridayClosedSaturdayClosedSundayClosed
Our Waco Battery Joe associates are ready to test and assess the performance and health of your car's battery health free of charge! This allows you to plan for a replacement instead of finding out when it is too late. Stranded in the Waco area? Don’t panic! We also offer free jumpstarts within the city limits! Replace your old car battery with a quality Continental Car Battery and enjoy free installation and a replacement warranty.
please help me, Im using an ASUS with an internal battery and it won't charge, the charger needs to be plugged on and when removed it switches off,is there a way of fixing the battery or i have to buy another one. Its the X551M.
Just follow these 3 simple steps to get your iPhone Battery Replacement done rapidly. Our #supertechies will ensure that you get your iPhone Battery replaced smoothly without even stepping out of your home or office. Though our state of the art iPhone Service Center is based in Gurgaon but you can certainly avail our iPhone Battery Replacement services pan India. You can get iPhone battery replacement in Delhi, Faridabad or Noida. Outside NCR? No problem! You can book our iPhone battery replacement services even if you are in Mumbai, Hyderabad, Pune, Lucknow, Chennai, Chandigarh and other locations across India.
iPhone users in most countries can initiate the battery replacement process online by scheduling an appointment with the Genius Bar at an Apple Store. The reduced price is also available at some third-party retailers and repair shops, as long as they are designated as an official Apple Authorized Service Provider.
Before placing an order for our battery pack rebuilding service, please read our terms & conditions.
Battery repairer
Repair battery
Watch batteries repair
Repair ebike battery
At AAMCO Brampton, ON, also serving the surrounding area, our technician inspects the alternator belts, brackets and connections and also tests voltage and current. Finally, the starter is inspected for proper connections and mounting and is tested to see how much electrical power is required to turn over the engine when the engine is cranked.
Menu Menu Golf Near Me Golf Courses Near Me Tee Times Near Me Driving Ranges Near Me Golf Tournaments Near Me Mini Golf Near Me Community Review a Course Activity Feed Leaderboards Find Golf Partners Find Golf Instructors Resources Golf Equipment Reviews Golf Articles & Tips Golf Course Yardage Maps Pro Golf Course Flyover Videos Pro Golf Video Lessons GolfLink FAQ Contact Us Book a Tee Time
[{"displayPrice":"$18.99","priceAmount":18.99,"currencySymbol":"$","integerValue":"18","decimalSeparator":".","fractionalValue":"99","symbolPosition":"left","hasSpace":false,"showFractionalPartIfEmpty":true,"offerListingId":"P0dFzdlo3iEXNagvBnqxpHiPHxHzwuATOLc2UmTmo%2FUbsBewWAASrZPs6bVuYwNS62oLe3hh5SRx7EFAFtudVjvbjbV%2BBne7lRC7yYOrskgskl8xviLmroLuIaMG4oTa5D8WB5PpQ5kkKs7Jb7Q%2BOLHFqBoTKc7LL4fijRGCPoAu6vHPIUcO9k5BPYVNYzKg","locale":"en-CA","buyingOptionType":"NEW"},{"displayPrice":"$18.99","priceAmount":18.99,"currencySymbol":"$","integerValue":"18","decimalSeparator":".","fractionalValue":"99","symbolPosition":"left","hasSpace":false,"showFractionalPartIfEmpty":true,"offerListingId":null,"locale":"en-CA","buyingOptionType":"PICKUP"}] $$18.9918.99 () Includes selected options. Includes initial monthly payment and selected options. Details Sold by DaoQuNa and Fulfilled by Amazon. 2300mAh Battery for iPhone 6s, DEJI Super High Capacity Replacement Battery for iPhone 6s A1633 A1688 A1700, with Professional Repair Tool Kit and Instructions -[2 Year Warranty] 3.9 out of 5 stars 70 ratings Available at a lower price from other sellers that may not offer free Prime delivery. Brand Deji Battery cell composition Polymer Recommended uses for product Watch Unit count 1 count Voltage 3.82 Volts Reusability Rechargeable
My desktop computer is getting very slow, and I have thought of replacing it with a laptop or notebook or whatever smalled units are available. reading this article about batteries, I wondered if I have to have a battery-operated unit. If I get a smaller system, I still plan on using it maily on my desk at home.
Batteries Automotive Car & Van Batteries Commercial Batteries Lawnmower Batteries Motorcycle Batteries Mobility Scooter
After the battery replacement, do you loose you jailbreak or you current OS, do they install the latest OS on you phone?