Batteries Automotive Car & Van Batteries Commercial Batteries Lawnmower Batteries Motorcycle Batteries Mobility Scooter
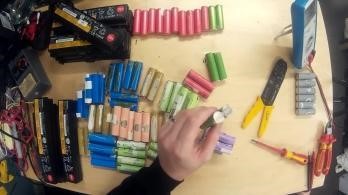
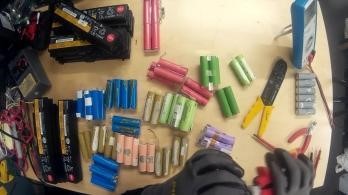
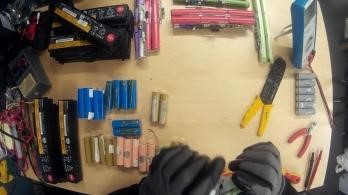
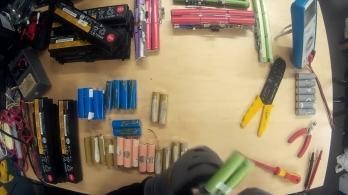
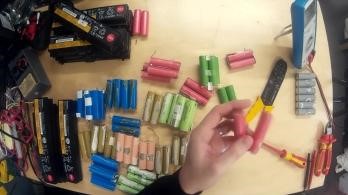
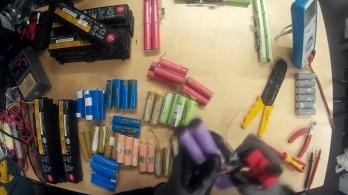
Ebike battery repairs
From the easiest-to-fix to the most complicated, here are the most common reasons your vehicle’s battery can’t hold a charge:
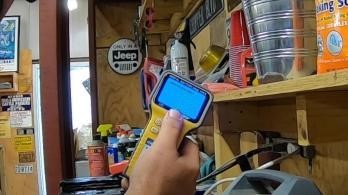
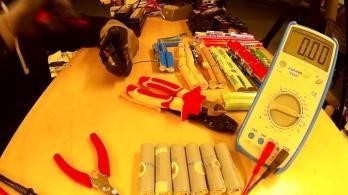
A multimeter is useful in ensuring that the voltage of a battery is within the range it's supposed to be in per the datasheet. Another good thing to do is to check the voltage of the battery directly after fully charging to make sure it doesn’t rapidly fall. Another clear indicator of a bad battery is a hot spot. If you feel the battery’s surface in various places during normal operation, you’ll be able to check for hotspots.
.
Battery iphone repair
You may need to press the lower connector with the spudger to make sure it is properly seated. Connecting the battery Installing the display Take the display in both hands and carefully fold it over.Press it down along the frame one by one. Fastening the back cover screws Ø 4.9 (24 Ratings) Bewerte unsere Anleitung Hat dir unsere Anleitung weitergeholfen? Wir sind auf deine Beurteilung gespannt. Submit rating Submit rating How did you like this repair guide? Submit Close Vielen Dank für deine Bewertung! Deine Bewertung wird nach unserer Überprüfung freigeschaltet. Comments Detail Replacing the back cover Replacing the screen Replacing the earpiece You might be interested in Detail iPhone X Battery €25.00 iPhone X Battery Repair Kit €45.00 iPhone X Screen (OLED) €117.00 iPhone X Screen (OLED) Repair kit €137.00 iPhone X Earpiece and Sensor Cable €14.00 iPhone X iSight Camera €30.00 iPhone X Adhesive frame for Screen €3.00 iPhone X Battery Adhesive Strips iPhone X Speaker €7.00 iPhone X Lightning Connector Gray €13.00 iPhone X Lightning Connector Silber iPhone X Taptic Engine €9.00 Please contact our customer service for any questions about iDoc's products and services. Send a message If you have a question about a guide or want to give us general feedback, just use our contact form Write a message Free shipping From a minimum order value of 79.00 € your order will be shipped free of charge within Germany. Call iDoc If you have any questions about our guides or services, call us from Monday to Friday, 10:00 a.m. to 6:00 p.m. +49 30 200 514 455 5 star service We offer top quality and service. Our customers confirm this as well. Shop Repair guides Blog Reset Want more information?
Having trained and passed fix2U’s comprehensive Repair Certification Programme, every fix2U Repair Hero can repair your device faster than a speeding bullet.
Battery repair
All in all for battery maintenance it'll get the job done......now will it last? seems to work well, charged up my battery and will check level of battery even when not plugged in Bon produit, il charge bien les batteries, sauf qu'on aurait apprécié un câble reliant la batterie un peu plus long.
Pls Help me with dis..... (1) i;ll like to charge my fone with a dell laptop battery whenever theres no power. can i connect my charger bit to the positive and negative direct to the battery? (2) how to i recharge the laptop battery itself. Can i do this with the charge system in an rechargeable torch?
Repair a battery
Some batteries are equipped with a solid-state switch that is normally in the “off” position and no voltage is present at the battery terminals. Connecting the switch terminal to ground or pulling it up often turns the battery on. If this does not work, the pack may need a code for activation. Battery manufacturers keep these proprietary codes a well-guarded secret to which even service personnel have no access.
Battery repair
Repair watch battery
Key fob repair
Batery repair
Iphone battery repair
Battery iphone repair
Battery iphone repair
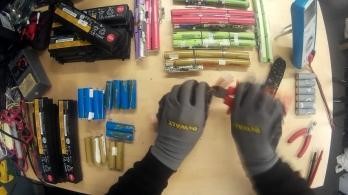
Repairing ebike battery
Battery repair for iphone
Watch batteries repair
Battery repairer
Hybrid batteries repair
Repair iphone 6s battery
This was the second time visiting Peter's Auto, and both times I had a relatively serious problem (wheel broken off the axle and cracked fuel pump). Peter and his team fixed my car both times promptly and skillfully for a…
Iphone battery repair
If you end up with a dead battery, whatever the season, follow these tips to safely recharge it. Difficulty: Easy Duration: 10-30 minutes How often: As needed Loose or corroded battery connections Extremely hot or cold temperatures Taking too many short trips Leaving the lights on for too long
What makes racing batteries so important?How to choose the right battery size for your RVUnexpected benefits of replacing your vehicle battery before it dies
This is not always as obvious as you may think. The overwhelming majority of dents and dings in a battery pack will only cause a minor short inside. The problem is that this minor short will manifest itself as a high level of self-discharge in that cell. That, of course, will throw the entire battery pack off balance.
Battery repair
not enough. important.battery have art.NN(for example hstnn-dbow HP).be sure your and stock have same oder capability art.NN.one time i purchase via ebay for fujitsu AH300.on internet my searching only 2 stocks said campability,another non.little design diferance.same voltage etc.good wiil be same or more place campability lists on internet.
My new laptop was normally used only for several days and then not used for few months and now it's li-ion battery is totally discharged. I have plugged power source even for 12 hours, but unfortunately it is still 0 % :-(. My battery data: 4ICR19/66 L12M4E01 14,88V 41Wh 2800 mAh Is there any way to bring it back to life? Is it possible to self discharge smart battery "to death"? Thanks for your help
Are you an e-bike rider? Then contact your dealer for the desired product. To be able to use the full range of Shopware 6, we recommend activating Javascript in your browser. English Deutsch English Français Italian Nederlands Schweiz, Deutsch Schweiz, Französisch Schweiz, Italienisch Continue Shopping Close menu Log in 0 Products Service Technology About us Find a FIT dealer E-Drive Drive Brakes Lights Electronic accessories Gears Attachments Workshop equipment Services Wheel set Workshop / shop Sales E-bike manufacturer Become a FIT specialist dealer Partnerships Support FIT E-Bike Control App Key card Navigation with Komoot System System comparison Advantages of FIT motors Advantages of FIT batteries Advantages of FIT displays Accessories E-Bike Tracker Tire pressure sensors Electronic frame lock Jobs and career Blog Taking an e-bike with you in a camper van Using cycle paths on an e-bike E-bike Buyer’s Guide Part 2 E-bike Buyer’s Guide Part 1 E-bikes and IoT Press Contact Responsibility Close menu Blog Repairing an e-bike battery REPAIRING AN E-BIKE BATTERY – YES OR NO?
Repair iphone 6s battery
With a pentalobe screwdriver in the standard tool kit, remove the two screws at the bottom of the iPhone.
Many of these causes can be avoided, especially with proper maintenance. But a dead battery isn’t always preventable. Thankfully, unless it’s severely damaged, it’s easy to get your battery up and running again. Inspect the Battery
We wish you good luck with your repair! If you found our instructions helpful, we would be happy to receive a positive evaluation. Required tools Heat gun Heat gun You can use a heat gun to heat parts that are glued on so they’re easier to remove. In most cases, you can also use a hairdryer. from €14.47 on Amazon For storing screws For storing screws We recommend storing your screws so you don’t mix up the various screws and small parts. €11.00 at the iDoc store iFlex opening tool iFlex opening tool Opening your smartphone can be a very delicate operation, especially if the glue is very persistent. The blade of the flexible but sturdy iFlex measures just 0.15 mm, so it fits in even the smallest gaps, such as between the screen and the frame. The practical iFlex is made of stainless steel and sits comfortably in the hand. This makes it the perfect assistant for every smartphone repair. €10.00 at the iDoc store Tweezers Tweezers We recommend using tweezers to remove screws and various small parts from your device. €12.00 at the iDoc store Pick Set Pick Set You need a flat but stable tool such as a pick to pry out parts that are glued in place. €2.00 at the iDoc store Plastic prying tool Plastic prying tool You need a flat plastic prying tool to disconnect the various plugs and connectors. Pentalobe PL1 screwdriver Pentalobe PL1 screwdriver You need the right screwdriver for removing pentalobe PL1 screws. €14.00 at the iDoc store Phillips PH00 screwdriver Phillips PH00 screwdriver You need the right screwdriver for removing PH00 screws. Y-type Y000 screwdriver Y-type Y000 screwdriver You need the right screwdriver for removing Y-type screws. Required replacement part iPhone X Battery iPhone X Battery €25.00 at the iDoc store Show all replacement parts for the iPhone X Replacement parts and tools for this repair Our tools plus the right spare part help you fix your device easily. Detail iPhone X Battery Repair Kit Detail iDoc Magnetic Pad together for €56.00 Add to cart Comments Watch video Steps Getting started with the repair of your iPhone X If you get stuck or have questions, you can post a comment. We’d be happy to help. 21 steps Open all steps Switching off your iPhone X Full width Turn off your iPhone X before making repairs to protect it from potential damage. To do so, press the standby button and one of the two volume buttons simultaneously for about three seconds. When the "Power Off" slider appears on the display, wipe it from left to right. Your iPhone will shut down completely within about 10 seconds. Removing the rear case screws
Iphone repair battery
This is not always as obvious as you may think. The overwhelming majority of dents and dings in a battery pack will only cause a minor short inside. The problem is that this minor short will manifest itself as a high level of self-discharge in that cell. That, of course, will throw the entire battery pack off balance.
Though Battery is fully charged... System shut downs after 15-20 minutes... But If plugged in works properly.. What would be the problem?
Is that battery really dead? You can tell if a battery needs replacing. This Fix-It Guide on battery testing tells how a household battery works, what often goes wrong, how to identify a battery problem, and what parts and tools you will need to fix it. It then gives simple step-by-step instructions for how to test a household battery. See button battery repair for small specialty batteries.
Be Part Of Our Story!
Watch batteries repair
It took about two (2) days for the green Charge LED to be solid green, indicating charging complete. It's entirely possible it finished overnight, but I wasn't in a rush to gather exact timings. That's one of the perks of smart battery tenders, once they're done with the charge you can leave them connected indefinitely without worry or harm.
Repair battery
We don’t recommend to run your car without a new battery or a decent quality battery. In doing so you are causing to much stress on the alternator which will eventually fail. The end result is a bigger repair bill. We don’t want that for you. Always replace the car battery in time.
Iphone repair battery
Total Car Diagnostics helps fellow home car owners, mechanics, technicians, garage shops, engineers, ECU programmers and auto repair centers — to significantly cut down on maintenance, repair costs, time, money, energy… and all other frustrating headaches involved with dealing with vehicles — by providing cost-effective advice, tools and recommendations.
Contact Us
About MidasProject SparkOur Midas GuaranteesEmail Sign Up & SaveRebatesContact UsPromo Legal Vehicle drop offs welcome. After Hours key drop off available at participating locations. SIGN IN Not Registered? Sign in to your Meineke Rewards account Forgot password? Introduce your city, province or postal code, to find stores near to you Locate me SUBMIT introduced data to locate stores BOOK NOW TODAY 04/15 SUNDAY 04/16 MONDAY 04/17 TUESDAY Introduce your city, province or postal code, to find stores near to you Submit introduced data to locate stores Locate me Meineke {[store.storeId]} {[store.distance | number:0]} mi Phone: {[store.trackingPhone]} {[store.phone]} Book it MORE open a dialog with SCHEDULE APPOINTMENT Toggle navigation Introduce your city, province or postal code, to find stores near to you Locate me Submit introduced data to locate stores (2) Account OR Introduce your email address Introduce your password SIGN UP FOR AN ACCOUNT Enter your phone number Enter Keytag ID Submit data in order to sign up Enter your first NAME Enter your last NAME Introduce your phone number Introduce your EMAIL ADDRESS Enter your POSTAL CODE Type a password Type again password to confirm Please email me exclusive Meineke offers and promotions. I agree to the terms and conditions of services provided by Meineke Create account Home Services Batteries Your Car Battery Service, Repair & Replacement Center
Ebike battery repairs
Lol, you're welcome Whitney! I know *exactly* how you feel. Get hangin' those shelves. ~ karen!
Repair : The battery of your iPhone 5s doesn't hold the charge or doesn't work at all ? This is a massive problem with many iPhone users after the one year warranty. Let us replace your old battery with a new battery tested.
At Battery Joe we continuously strive to provide the best services available to our customers. We would love to hear your experience at our Battery Joe South Valley Mills Drive Location.
Take your car, truck or SUV to AAMCO Brampton, ON, also serving the surrounding area, for a starting and charging system and our free Initial Vehicle Check. It takes an expert to diagnose the starting and charging systems in your vehicle. Our technicians will inspect the battery connections, the hardware, the condition of the case, the electrolyte level (where applicable), and the battery load (its ability to perform its function).
Find a Midas StoreRequest AppointmentShop For TiresCoupons & OffersPricing & Estimates
Great, NOW YOU TELL ME!! Kidding…. My fault. Just threw away three batteries that didn’t survive the winter on the charger. Bought a pair of the newer, larger capacity batteries, but I’m dying to try your method when my one remaining old battery dies. Thanks for the tip though!!
!
Repair ebike battery
Repair ebike battery
Batery repair
Hybrid batteries repair
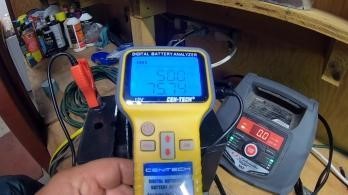
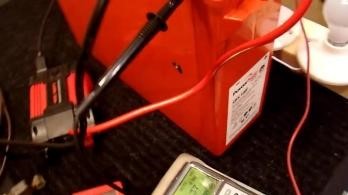
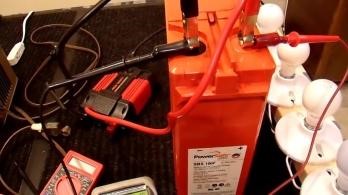
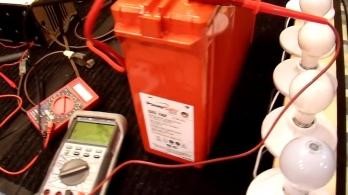
Step 8. Touching the red probe to the positive (red) terminal and the black probe to the negative (black) terminal, read the voltage shown on the multimeter. In my case the battery was carrying a charge of 0.06 volts. Which is *almost* nothing, but not completely nothing.
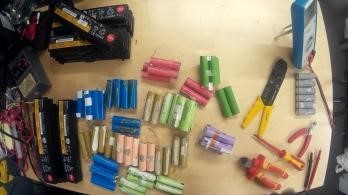
Test and diagnosis: the battery is tested and checked for damage. The diagnosis will determine the next steps.Repair: A team of high-voltage specialists repairs the battery or replaces certain parts of the pack. Battery packs consist of modules and cells. The modules are easy to replace.
After clicking the link, you will enter a third-party website. Huawei is not responsible and has no control over this third party website.
my laptop battery output =11 v but its dead now , can i replace the battery with (non specific) AC adapter that's give me the equivalent output =11 or 15 v .. could this hurt my motherboard or anything ??
i use hp-15 notebook laptop and when i power on it it says that problem with battery(internal) 601 problem and needs to be replaced. so what shall i do? is it a problem of Cemos battery or external battery? which battery did i replaced? Though Battery is fully charged… System shut downs after 15-20 minutes… But If plugged in works properly.. What would be the problem?
Characteristics: For reconditioning, any charger would do. It is paired up with resistor so as to reduce voltage in case you fear for the safety of battery damaged by charger,. One can use old battery charger as well for reconditioning batteries. You can directly attach them by wires to the battery.
Repair hybrid battery
Battery repairs
Electric bike battery repairs
Ebike battery repair
If your battery is not holding its charge, charging it for longer will usually have no effect. This is because low acid levels or other problems with the battery are probably preventing it from charging efficiently.
Watch repair battery
Your car's battery provides energy to power your car's electronic system, which includes parts such as your car's sound system, air conditioning, and more. Energy is also stored in the battery to turn your vehicle on. Once the car is on, a series of reactions start in the battery, which generates electricity. Your car's alternator continues generating electrons to keep powering the battery. A standard battery contains twelve grids on six SLI battery cells, which means there are two grids per cell. Each cell emits two volts of electricity, which means the battery produces twelve volts of electricity in total.
Hai... My hp laptop battery is down for about one month...it is not charging, but i still using by adapter...is there any problem using lptp without battery?
We put together a guide on how to get more life out of batteries, and easy-to-use tips to keep your battery healthy.
Yes it is not a good practice. The battery doesn’t work at its peak performance capacity and also there is high chances of the charging jack or battery getting spoilt due to overcharging.
Step 2: Pick a Time & Place How It Works
Battery repair iphone
Battery repair iphone 6s
Battery repairing near me
Hybrid battery repairs
Establishing the connection to the battery terminals should now enable charging. If the charge current stops after 30 seconds, an activation code may be required. Some battery manufacturers add an end-of-battery-life switch that turns the battery off when reaching a certain age or cycle count. They argue that customer satisfaction and safety can only be guaranteed by regularly replacing the battery. Mind you, such a policy also rotates inventory.
Next, do a function check. Are there any signs of corrosion? This negative reaction is unavoidable given the nature of chemicals present in batteries. However, one can always apply a protective layer to avoid battery leak (in case it eats away the case). If you scrub the terminals with Sodium Bicarbonated scrubbing tool, it can remove the corrosion away. Next, you should look for battery voltage. Low battery voltage is a red flag one should heed to condition your battery before it shuts down in middle of something important. HOW TO RECONDITION OTHER TYPES OF BATTERIES: Reconditioning your laptop battery
Cell2Fix is one of the city's best cell phone repair shops in the city. Their Professional Team of Technicians with over 20 Years of Experience. They are providing the lowest price guarantee; customers can enjoy the convenience of getting gadgets repaired at their place. They complete all eligible repairs in 30 minutes. They are also providing diagnostics and quotes to their valid customers. They ensure the reliable and durable replacement of broken parts. They also offer all kinds of software installation and troubleshooting services. They are beating the best quotes by 10%. Unlocking Services, Water/liquid Damaged Mobile, Cracked or Broken Screen Problem, Digitizer and Lcd, Battery, Power Issue, Camera Replacement, Power/volume Button, I Phone, Samsung, Blackberry, Nokia, Lg, Software Installation, Compute, Laptop Service and Repair & Tablet Cases Book Appointment inf***@c***.com cell2fix.com (905) 453-8308 Reviews Write a Review
Interesting stuff, over my morning cuppa tea ✅. Might be worth recycling dud Ryobi batteries and selling them for a few £€¥$
This process is eco-friendly too because batteries are difficult to recycle. So, if you are tempted by now to consider bringing life back to your good ol’ battery, see the following guide. Required equipment VoltmeterBattery chargerGloves and safety gogglesPlastic funnel1 pound baking sodaNeoprene resistantScrewdriver1 gallon of waterPlastic bucket How to recondition car batteries Reconditioning groundwork
Test and diagnosis: the battery is tested and checked for damage. The diagnosis will determine the next steps.Repair: A team of high-voltage specialists repairs the battery or replaces certain parts of the pack. Battery packs consist of modules and cells. The modules are easy to replace.
Repair iphone 6s battery
Battery iphone repair
Repair iphone 6s battery
Electric bike battery repairs
We cary both College & Pro Merchandise for teams including: Baylor Bears, UT Longhorns. Texas Tech, A&M, Dallas Cowboys, Denver Broncos & more.
If you hear the sweet sounds of your engine starting, thank the person who helped you and get on your way! If your vehicle still won’t start, it’s time for a new battery.
If you neither have the confidence, skill, and time to do it nor have the budget and waiting time to consider going to a certified Apple service provider, a local repair shop is another option.
There are many signs to look out for that may signal it’s time to get a new battery for your Toyota. Read through our list below, and if any apply to you, it’s time to bring your vehicle into our service department for an inspection, and possible battery replacement. If you’ve had your battery for the last 3 – 5 years. If your battery has extended past its set warranty period. If your vehicle takes longer to start than usual. If the lights inside your vehicle aren’t working, or are dimmer than usual. If the temperature controls aren’t working properly. If you’ve had to jump-start it or needed to use a portable charger. If your battery is corroded, which may also give off a bad smell. Why Choose Genuine Toyota Premium Batteries? There’s a lot of car and truck batteries out on the market, but if you’re driving a Toyota you should make sure your vehicle also has a premium Toyota genuine battery.
We pick up pretty much everything we use from Battery Hookup. They carry just about anything you could possibly need on your next DIY build.
A selection of quick iOS tips that will make you a lot more time-efficient in the long run.
Have never wanted to leave feed back for any business until I dealt with Peter!! When you have what's viewed as a prestige car, Mercedes, most garages wont touch it, or will take advantage., gouge you financially. Peter is a…
2023 Yellow Pages Digital & Media Solutions Limited. Yellow Pages Group & Design™, CanPages™, and CanPages Life Around Me & Design™ are trademarks of Yellow Pages Digital & Media Solutions Limited in Canada. Home - Contact Us - Corporate - Privacy - Terms - Business Directory | rev. 2.36.0.0 (2021-11-01).
Just follow these 3 simple steps to get your iPhone Battery Replacement done rapidly. Our #supertechies will ensure that you get your iPhone Battery replaced smoothly without even stepping out of your home or office. Though our state of the art iPhone Service Center is based in Gurgaon but you can certainly avail our iPhone Battery Replacement services pan India. You can get iPhone battery replacement in Delhi, Faridabad or Noida. Outside NCR? No problem! You can book our iPhone battery replacement services even if you are in Mumbai, Hyderabad, Pune, Lucknow, Chennai, Chandigarh and other locations across India.
Step 5. Remove the 2 plastic side pieces. They're the things you press in to remove your battery from your drill.
iPhone Battery Replacement cost depends on its model. Latest models have higher cost as compared to older ones. However, we at Rapid Repair® use genuine parts for every repair and we aim to deliver the entire experience at affordable prices. You can check the cost of your iPhone Battery Replacement Service by clicking on your iPhone model below. You can also connect with our tech expert at 8130609004 via Call or WhatsApp if you have multiple issues with your iPhone and need to get an estimate of the entire repair service.